Published December 6, 2015
This walkthrough will show you how to create a very basic logging actor. All it needs to do is receive a “Log” message. This Log message will append a string to be logged to a text file. Note: The built in tools for working with actors have been significantly improved in LabVIEW 2015. See this document for more instructions on the LabVIEW 2015 AF Project Provider. In LabVIEW 2014 and before use Post not found: improved-actor-framework-message-maker. I’ll include instructions for both versions.
This article is part of the Actor Framework Basics series:
- Actor Framework Basics: Part 1 - The Basics
- Actor Framework Basics: Part 2 - The Actor
- Actor Framework Basics: Part 3 - Launching and Communicating
- Actor Framework Basics: Part 4 - Being Productive With Actors
- Actor Framework Basics: Walkthrough - Creating a Logger Actor
First Step: Creating the actor
Start by creating a blank project.
2015 and Later
In your new project right click on “My Computer” and select New -> Actor

Next you’ll see the following dialog. Enter “Logger” into the “Name” Field and click OK

2012, 2013 and 2014
Since you’re starting from a blank project then the Actor Framework won’t be loaded into memory, so you won’t be able to inherit from it. So you’ll first need to add the framework LVLib to your project.
<vi.lib>\ActorFramework\Actor Framework.lvlib
Next create a class and name it “Logger.lvclass”. Finally change it’s inheritance to inherit from Actor Framework.lvlib:Actor.lvclass

Style Recommendation:
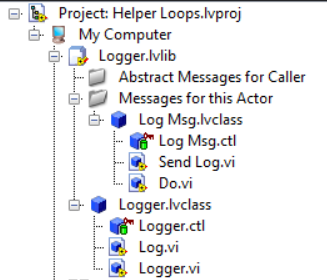
In the project: Each actor will have a handful of messages associated with it (we haven’t created any yet, but the messages are separate LabVIEW Classes). We want these message classes to be strongly coupled to our actor, so it makes sense to group them all together. To do this, create a LVLib and name it the same thing as your actor. Put your actor class inside it. Create a virtual folder inside the LVLib and name it something like “Messages”

On the File System: Actors will have a bunch of class methods associated with them, and we’ll have all the message classes that are related too. This creates a decent number of files and as you’re adding/deleting/renaming things you’ll want to be consistent with file placement. First, create a folder that will contain everything related to your actor. That folder should contain:
- The LVLib that contains all files related to your actor
- A folder for your actor class and it’s methods
- A folder for all the messages
- This folder will contain a folder for each message
If you’re using the right click menus and other AF tools these style guidelines will be enforced automatically.
Second Step: Adding Functionality
Our actor has now been created, but it still can’t really do anything.

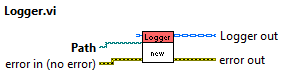
First things first: Our Logger needs to know where to log things. I’ll add a path to the actor’s private data. We’re going to need to set this log path. Since the logger NEEDS a path before it’s really useful, I like to create a “constructor” type VI to do this. Like this:
Now the preparation is done. Next we want to get our actor to do something once it’s launched. What do we know about actors?
- It’s an Object.
- How do you interact with an Object? You call methods on it.
- It’s a QMH.
- How do you interact with a QMH? You send it messages.
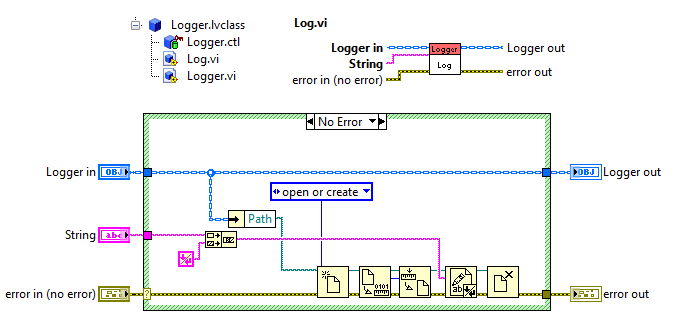
So how do you interact with an Actor? You send it messages that will call methods on the object obviously! First, create the method in our actor class. Create a normal class static method. Give it a string input and implement the code that we want to execute when the message is received. In this case, just append the string to the path specified.
Now we need to create the message class that will call this method.
2015 and Later
Right click on the “Log” Method in the project explorer. From the menu select Actor Framework -> Create Message.

This will cause a bunch of scripting to run in the background, you’ll see some windows appear, then disappear while it’s working.
2012, 2013 and 2014
First, go to Tool-> Actor Framework Message Maker(MGi). Using NI’s Message maker is very similar, but the result it not quite as nice. See this article for more information about Post not found: improved-actor-framework-message-maker

Next, select the methods that you’d like to create messages for. In this example we just want to make a message for the Log Method.

Finally, click “Build/Update Selected Message(s). Once the building is complete you can close the Message Maker window.
Now the message has been created and you should have something like this:

All of the scripting tools created 3 things:
- The Log Msg Class: This class contains the data associated with the message. In this case, it’s just a string. This data for this message is determined using the connector pane of the VI you created the message from
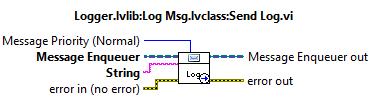
- The Send Log Method: This is a helper method that properly constructs the message class and sends it to the actor.
- The Do Method: This is the method that is called when an actor receives the message.
So if someone wants to send my actor the log message, they just need my enqueuer, and then they can run the “Send Log” Method.
Launching the Actor
The actor’s code is already completed, so now we just need to run it. In this section we’ll just launch the actor, send it one log message, then stop the actor. Actors can launch more actors, and normally you’ll be launching a bunch of actors to form a chain or pyramid. But there’s always a first actor that you launch. This is called the root level actor. You need a plain old VI to do this. This VI’s job is just to set up everything so the actor can launch successfully. In this example, that means preparing the actor to launch (by setting its log path) then launching the actor. Next the VI will send the running actor a log message, then it will send a message that tells the actor to stop. Here’s how to do all that:
2014 and Later
There is a VI on the Actor Framework Pallet that will launch a root level actor for us. We just need to prep the object, call “Launch Root Actor.vi” on it, then send it messages as needed.

2012 and 2013
First we need to create the Message Queue Pair. Then we need to get the Enqueuer part of the pair. Then we can call the Launch Actor VI. We don’t actually end up using the queue pair for anything with root level actors, but an actor can’t launch unless it has a valid enqueuer.
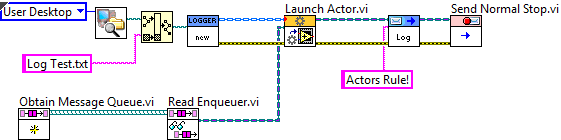
Now if we run this new VI we should see a log file appear on our desktop with “Actors Rule!” written in it. What happens if you…
- … delete the “Send Normal Stop” VI? The actor will be launched and running the the background, but never stopped. Even though your Launcher VI has finished execution, your Actor has not. Unfortunately there’s not a graceful way to stop the actor once you’re forgotten about it like this (unless your actor is a Monitoring Actors. You’ll have to exit your project, which will abort all running VIs
- …put the “Send Log” VI in a for loop? This will send the logger multiple log messages, and each one will be appended to the log file.
- …put the “Launch Root Actor” VI in a for loop? This will launch multiple loggers (maybe they’re all logging to the same path, maybe you put the Log.vi in the for loop as well and you created unique log files for each iteration). You will then have multiple enqueuers that you can send messages to. You could add some code to send log messages to only 1 of them. Maybe send some log messages to a handful of them, maybe send some other log messages to all of them. Don’t forget to send stop messages to all of them though!